
شرح استخدام مستشعر الحركة PIR Sensor مع لوحة اردوينو
نبذة:

الادوات المطلوبة:
- PIR Sensor
- لوحة اردوينو
الخطوات:

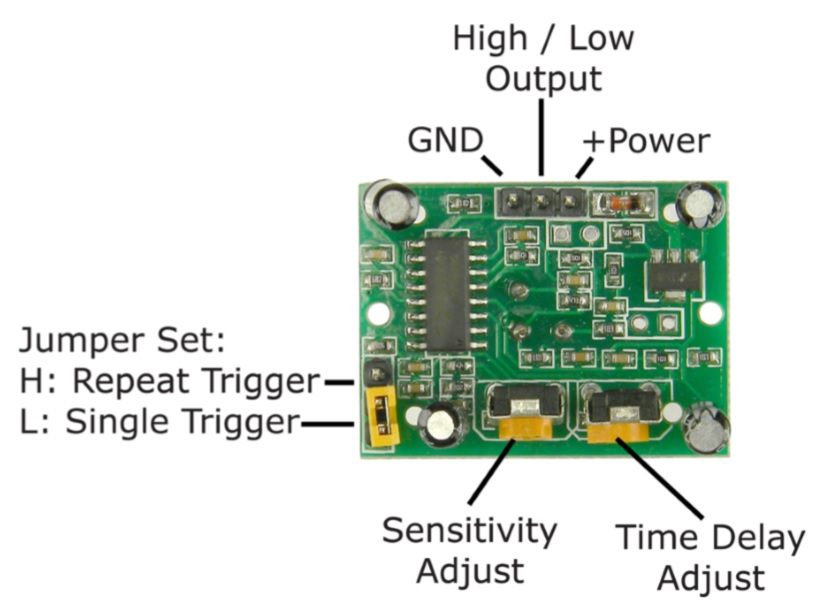
التوصيل:
قم بتوصيل اطراف المستشعر بلوحة اردوينو طبقا للجدول التالي

كتابة الكود:
قم برفع هذا الكود علي لوحة اردوينو
/*
 * //////////////////////////////////////////////////
 * //making sense of the Parallax PIR sensor's output
 * //////////////////////////////////////////////////
 *
 * Switches a LED according to the state of the sensors output pin.
 * Determines the beginning and end of continuous motion sequences.
 * The sensor's output pin goes to HIGH if motion is present.
 * However, even if motion is present it goes to LOW from time to time,
 * which might give the impression no motion is present.
 * This program deals with this issue by ignoring LOW-phases shorter than a given time,
 * assuming continuous motion is present during these phases.
 *
 */

/////////////////////////////
//VARS
//the time we give the sensor to calibrate (10-60 secs according to the datasheet)
int calibrationTime = 30;

//the time when the sensor outputs a low impulse
long unsigned int lowIn;

//the amount of milliseconds the sensor has to be low
//before we assume all motion has stopped
long unsigned int pause = 5000;

boolean lockLow = true;
boolean takeLowTime;

int pirPin = 3;    //the digital pin connected to the PIR sensor's output
int ledPin = 13;


/////////////////////////////
//SETUP
void setup(){
  Serial.begin(9600);
  pinMode(pirPin, INPUT);
  pinMode(ledPin, OUTPUT);
  digitalWrite(pirPin, LOW);

  //give the sensor some time to calibrate
  Serial.print("calibrating sensor ");
    for(int i = 0; i < calibrationTime; i++){
      Serial.print(".");
      delay(1000);
      }
    Serial.println(" done");
    Serial.println("SENSOR ACTIVE");
    delay(50);
  }

////////////////////////////
//LOOP
void loop(){

     if(digitalRead(pirPin) == HIGH){
       digitalWrite(ledPin, HIGH);   //the led visualizes the sensors output pin state
       if(lockLow){
         //makes sure we wait for a transition to LOW before any further output is made:
         lockLow = false;
         Serial.println("---");
         Serial.print("motion detected at ");
         Serial.print(millis()/1000);
         Serial.println(" sec");
         delay(50);
         }
         takeLowTime = true;
       }

     if(digitalRead(pirPin) == LOW){
       digitalWrite(ledPin, LOW);  //the led visualizes the sensors output pin state

       if(takeLowTime){
        lowIn = millis();          //save the time of the transition from high to LOW
        takeLowTime = false;       //make sure this is only done at the start of a LOW phase
        }
       //if the sensor is low for more than the given pause,
       //we assume that no more motion is going to happen
       if(!lockLow && millis() - lowIn > pause){
           //makes sure this block of code is only executed again after
           //a new motion sequence has been detected
           lockLow = true;
           Serial.print("motion ended at ");      //output
           Serial.print((millis() - pause)/1000);
           Serial.println(" sec");
           delay(50);
           }
       }
  }
يمكنك ان تجد هذا الكود علي موقع شركة اردوينو بالضغط هنا
افتح شاشة الـ Serial Monitor
واختر السرعة: 9600قبل ان يبدأ المستشعر ف العمل , يحتاج فترة تتراوح من بين 30 ثانية الى 60 ثانية حتى يدخل الي وضع الاستعداد:
calibrating sensor ..................عند بدأ المستشعر بالعمل تظهر هذة الرسالة:
SENSOR ACTIVEفي حالة حدوث اي حركة بالقرب من عدسة المستشعر . تظهر الرسالة
motion detected at 35 secالى ان تنتهي الحركة
motion ended at 44 secللحصول علي معلومات إضافية حول المستشعر , يمكنك تحميل الداتا شيت الخاصة بالمستشعر من الرابط التالي: Datasheet
مستشعر الحركة و اردوينو - Motion Sensor
PIR Sensor Tutorial Get Started with PIR Sensor and arduino

0 التعليقات :
إرسال تعليق